In this blog we will introduce how to use stepper motor driver with modbus communication. A practical example will answer any questions you may have about PoStep60 and modbus communication.
What will we try to achieve?
Our plan is to read few driver’s parameters and make some stepper motor movements using a Postep60 Modbus commands described in PoStep60 user’s manual.
Let’s see what HW we need to do the job:
- An Arduino board. We will use Arduino Mega 2560.
- Stepper motor driver with modbus communication: PoStep60-256 with the latest firmware update (version 1.20) that can be free downloaded from product page.
- An adapter board with differential bus transceiver. We will simply use chip SN65176BD.
- Optional, Uart (RS232) to USB converter (PoUSB12)
- And of course an stepper motor and DC power supply. In our case stepper motor Nema-17 and switching power supply PoPower 12-25
OK, let’s start!
First we will prepare peripheral. PoStep60-256 stepper motor driver with modbus communication uses Modbus RTU protocol over RS485 transmission lines. That’s why we need to prepare the adapter board to connect it to Arduino’s Uart port.
We will use a differential bus transceiver SN65176BD from TI and connect it as follows:
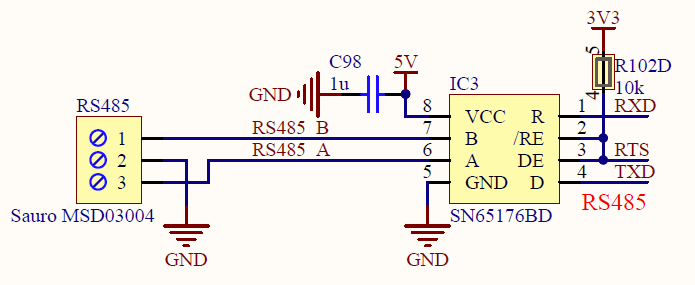
Modbus communication over RS485 -adapter circuit schema
After that we do the connection of the entire HW as shown in picture bellow. Don’t forget plugged the main AC power (110/ 230VAC) to power supply module. See the connection diagram below.

The next step is configure the Postep60-265 motor driver. We do that in PoStep60v1.20 application.
- Use USB cable to connect with the PoStep60-256.
- Run the PoStep60_v1.20 .exe and in a Driver setup tab select “Enable auto run” and set Modbus address and configuration. In our case we will set address to “0x20” and choose “BR: 9600; P: Even” configuration.
At the end we write values to driver! So, now we had set the driver.

We continue with Arduino programming:
For the demo PoStep60-256 ModbusRtu over RS485 communication we will first download the Modbus_DEMO_PoStep60.ino file from the PoStep60-256 product page. The application uses a library <ArduinoModbus.h>.
Modbus serial port must have address, baudrate and parity set as we set the driver in PoStep60v1.20 application described above. We use “Serial1” for print terminal port with BR 9600 and no parity check.
ModbusRTUClient.begin(9600, SERIAL_8E1);
Serial1.begin(9600,SERIAL_8N1);
We had done all the work. Compile the code and load it to your Arduino board.
Application demonstrates:
- reading driver’s HW/FW info, voltage, mode and step mode
- driving a stepper motor with different speeds in both direction using commands: Run/Sleep(0x03), invert direction(0x55) and set requested speed(0x54)

To run the demo again, please reset Arduino board.
Also try test other Postep60 modbus commands using the following functions:
 PoStepModbusRead(int Rd_command, int slaveID)
 PoStepModbusWrite(int Wr_command, int slaveID, int command1, int command2, int command3)
Please read the PoStep60 user manual for detailed information about commands.
The post Stepper motor driver with modbus – How to use it. appeared first on PoBlog™.